最近需要从零开始开发一个后台管理系统,因为之前都是用的Vue3、Vue2,React的使用经验仅仅只有一次采用Taro开发小程序的经历,所以这次想采用React框架开发,来深入了解React的开发体验。
创建项目
因为 Create React App 是基于webpack的全量构建,当项目体积变大,开发时间和构建时间也会大幅增加。原因是,无论进行任何更改,CRA都会全量的重新构建应用。
Vite是按需构建的,将一个应用分为两个部分:依赖和源码。
- 依赖在开发过程中,基本不会变动。
Vite使用esbuild(基于Go语言,比传统JS要快10-100倍)预打包了依赖,而且由于依赖变动极少,所以会被缓存起来以节省大量时间。 - 源码采用了ESM(ECMAScript modules)作为模块体系。好处是无需打包,按需加载,所以速度快的难以置信。
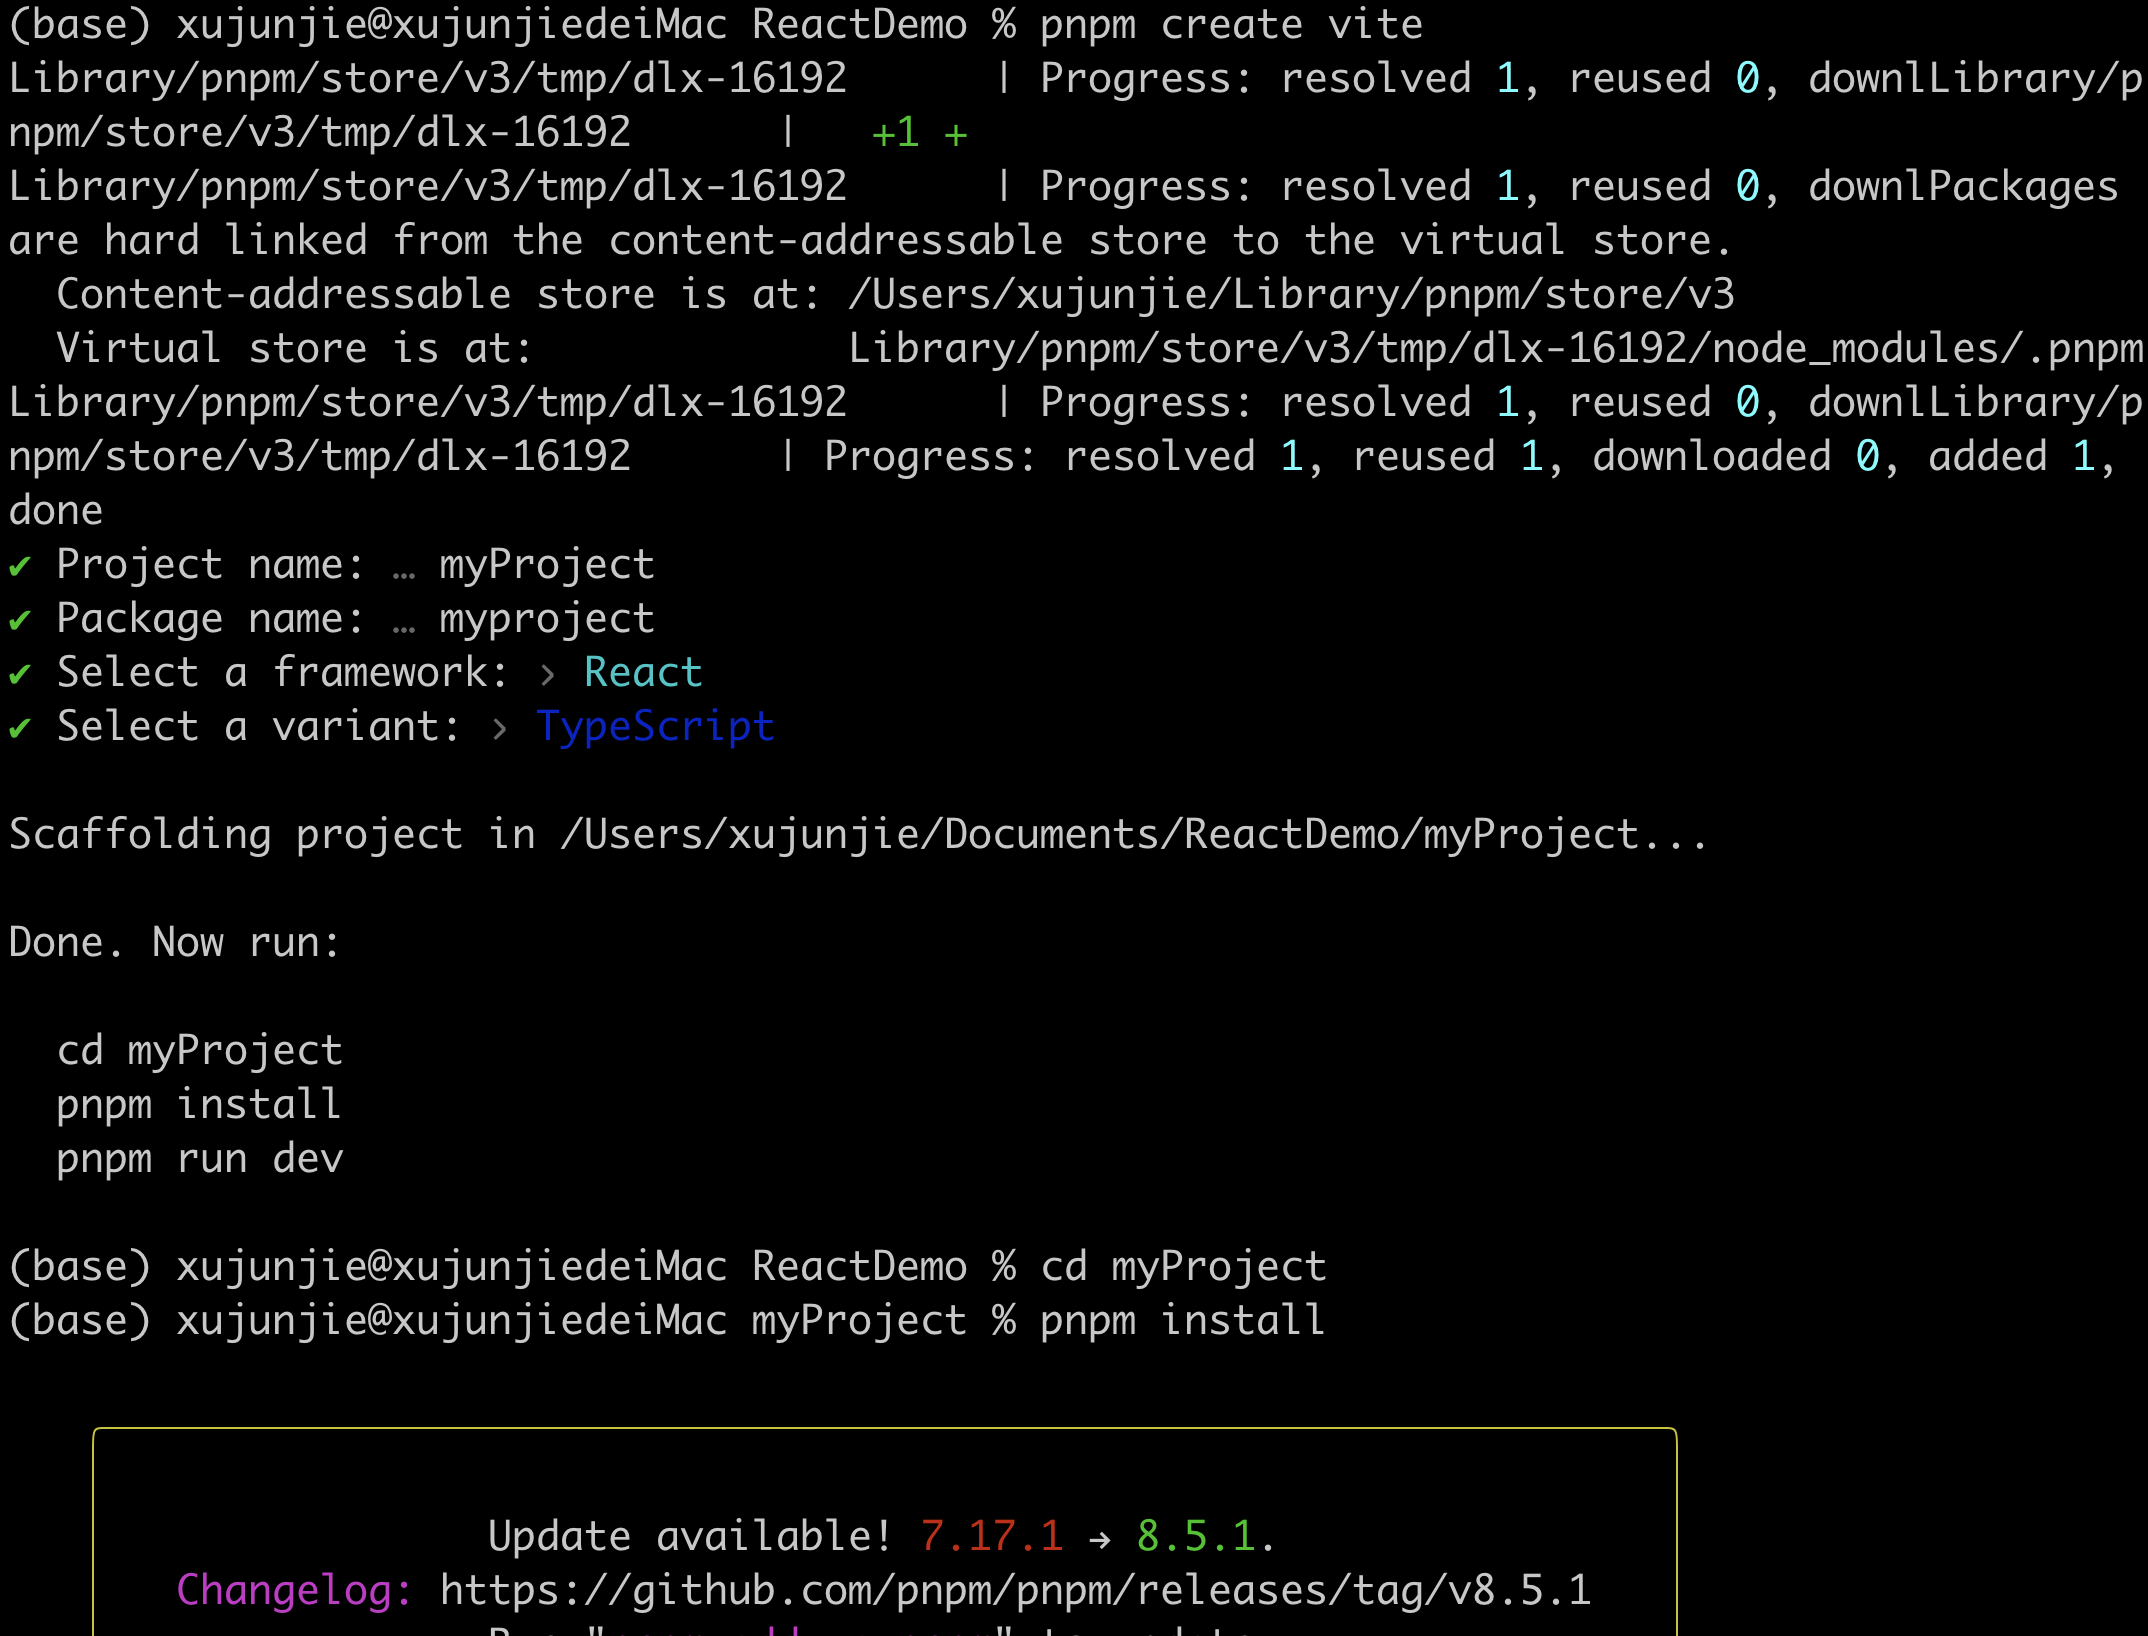
言归正传,开始创建项目。按照官网运行命令pnpm create vite,输入项目名,然后依次选择React、TypeScript创建项目。

创建好之后进入项目文件夹,运行pnpm install安装依赖,接着运行pnpm dev可以启动项目。
配置 Prettier
Prettier 是一个代码格式化程序,侧重于代码格式化检查
运行命令安装Prettier pnpm add -D prettier,然后添加两个文件.prettierrc.js(Prettier的配置文件,定义Prettier的代码格式化规则) 和 .prettierignore(Prettier的忽略文件,定义不需要进行代码规范检查的文件)。完整的Prettier配置规范参考Prettier官方文档。
.prettierrc.js文件参考内容:
module.exports = {
  printWidth: 120, // 指定编译器换行的行长
  tabWidth: 2, // 指定每个缩进空格数
  endOfLine: 'auto', // 换行符 Linux环境文件行尾序列是CRLF Windows是LF
  semi: true, // 在语句的末尾输入分号
  singleQuote: true, // 使用单引号而不是双引号
  trailingComma: 'none', // 在多行逗号分隔的句法结构中尽可能输入尾随逗号
  bracketSpacing: true, // 在对象字面量中的括号之间输入空格
  jsxBracketSameLine: true, // 将多行 JSX 元素的 > 放在最后一行的末尾,而不是单独放在下一行
  arrowParens: 'always', // 在唯一的箭头函数参数周围包含括号
  useTabs: false, // 使用制表符而不是空格缩进行
  ignorePath: '.prettierignore',
  proseWrap: 'never',
  htmlWhitespaceSensitivity: 'strict',
};
.prettierignore文件参考内容:
# Ignore artifacts:
/node_modules
/dist
.prettierignore
以上是只是参考,可以按照实际需求去修改配置。
配置 ESLint
ESLint可以保证代码一致性和避免错误,其实就是一个代码检查工具。
刚创建好的项目中默认带有.eslintrc.cjs这个文件,这是一个 CommonJS Module,ESLint的配置文件。因为vite默认使用ESM,为了能支持 CommonJS ,我们把package.json中的"type": "module"去掉,同时把文件.eslintrc.cjs手动改为.eslintrc.js。
以下是我常使用的eslint插件:
eslint-config-prettier:禁用所有与格式相关的eslint规则,解决prettier与eslint规则冲突,确保将其放在 extends 队列最后,这样它将覆盖其他配置。eslint-plugin-prettier:基于prettier代码风格的eslint规则。eslint-plugin-import:ES2015 +(ES6 +)导入/导出语法的检查eslint-plugin-react:检测和规范React代码的书写的插件eslint-plugin-react-hooks:专门用来检查Hooks 是否正确被使用@typescript-eslint/parser:代替eslint默认的解析器 Espree 对 TypeScript 的进行解析eslint-plugin-react-refresh:验证您的组件是否可以通过快速刷新安全地更新。eslint-plugin-simple-import-sort: 自动修复的导入排序。
一口气安装和ESLint相关的插件
pnpm add -D eslint eslint-config-prettier eslint-plugin-import eslint-plugin-prettier eslint-plugin-react eslint-plugin-react-hooks eslint-plugin-react-refresh eslint-plugin-simple-import-sort @typescript-eslint/eslint-plugin @typescript-eslint/parser
接下来在.eslintrc.js中配置eslint的规则,以下是参考配置:
module.exports = {
  env: {
    browser: true,
    es2021: true,
    node: true
  },
  extends: [
    'eslint:recommended',
    'plugin:react/recommended',
    'plugin:@typescript-eslint/recommended',
    'plugin:prettier/recommended', // 整合typescript-eslint与prettier
    'prettier' // 使用prettier格式化代码
  ],
  overrides: [],
  parser: '@typescript-eslint/parser',
  parserOptions: {
    ecmaFeatures: {
      jsx: true
    },
    ecmaVersion: 'latest',
    sourceType: 'module'
  },
  plugins: ['react', '@typescript-eslint', 'prettier', 'simple-import-sort', 'import'],
  settings: {
    react: {
      version: 'detect'
    }
  },
  rules: {
    'no-var': 'error',
    'no-console': process.env.NODE_ENV === 'production' ? 'warn' : 'off',
    'no-debugger': process.env.NODE_ENV === 'production' ? 'warn' : 'off',
    'comma-dangle': ['error', 'only-multiline'],
    'no-shadow': 0, //  关闭全局的检查,采用 ts 的,避免 enum 的报错
    '@typescript-eslint/no-shadow': 2,
    'no-unused-vars': 0, // 关闭全局的检查,采用 ts 的,规避 enum 的报错
    '@typescript-eslint/no-unused-vars': 1,
    'prettier/prettier': 'error',
    'arrow-body-style': 'off',
    'prefer-arrow-callback': 'off',
    'react/jsx-uses-react': 'off', // React 17及以后引入了新的 JSX 编译方式,无须在组件中显式地 import React,可关闭
    'react/react-in-jsx-scope': 'off',
    'react/jsx-uses-vars': 'error',
    'react/no-unknown-property': ['error', { ignore: ['css'] }],
    // '@typescript-eslint/no-explicit-any': ['off'],
    'simple-import-sort/imports': [
      'error',
      {
        groups: [
          // Side effect imports.
          ['^\\u0000'],
          // Packages.
          // Things that start with a letter (or digit or underscore), or `@` followed by a letter.
          ['^@?\\w'],
          // Absolute imports and other imports such as Vue-style `@/foo`.
          // Anything not matched in another group.
          ['^'],
          // Relative imports.
          // Anything that starts with a dot.
          ['^\\.'],
          // 样式放最后
          ['.*\\.(s|(post))?css$']
        ]
      }
    ]
  }
};
配置 Stylelint
虽然现在JSS(CSS in JS)很流行,尤其是React开发,更有react-jss的库出现,但是也无法让大多数前端开发兄弟们忘记传统css样式文件的编写手感,尤其像less、sass这样的预处理器,更让css拥有了更快捷、舒适的样式编写体验。
这里简单讲讲怎么配置Stylelint。附加的插件有这几个:
stylelint-config-prettier:禁用所有与格式相关的 Stylelint 规则,解决 prettier 与 stylelint 规则冲突,确保将其放在 extends 队列最后,这样它将覆盖其他配置(可以使用自己喜欢的可共享配置,而不会在使用pettier 时妨碍其风格选择)stylelint-config-recess-order:用来指定样式排序,比如声明的块内(插件包)属性的顺序,例如:先写定位,再写盒模型,再写内容区样式,最后写 CSS3 相关属性。stylelint-config-standard:官网提供的 css 标准stylelint-prettier:基于 prettier 代码风格的 stylelint 规则
运行命令安装 Stylelint 相关库:
pnpm add -D stylelint stylelint-config-prettier stylelint-config-recess-order stylelint-config-standard stylelint-prettier
然后添加配置文件.stylelintrc.js,更多更详细配置参考Stylelint文档:
module.exports = {
  extends: ['stylelint-config-standard', 'stylelint-config-rational-order', 'stylelint-prettier/recommended'],
  rules: {
    'block-no-empty': true, // 禁止出现空块
    'declaration-empty-line-before': 'never', // 要求或禁止在声明语句之前有空行。
    'declaration-block-no-duplicate-properties': true, // 在声明的块中中禁止出现重复的属性
    'shorthand-property-no-redundant-values': true, // 禁止在简写属性中使用冗余值。
    'color-hex-length': 'short', // 指定十六进制颜色是否使用缩写
    'color-named': 'never', // 要求 (可能的情况下) 或 禁止使用命名的颜色
    'comment-no-empty': true, // 禁止空注释
    'font-family-name-quotes': 'always-unless-keyword', // 指定字体名称是否需要使用引号引起来 | 期待每一个不是关键字的字体名都使用引号引起来
    'font-weight-notation': 'numeric', // 要求使用数字或命名的 (可能的情况下) font-weight 值
    'no-descending-specificity': null // 禁止低优先级的选择器出现在高优先级的选择器之后
  }
};
添加样式检查忽略文件.stylelintignore:
*.js
*.tsx
*.ts
*.json
*.png
*.jpg
*.eot
*.ttf
*.woff
Stylelint 可以选择性添加配置,不必要完全按照流程添加
配置 tsconfig
{
  "compilerOptions": {
    "baseUrl": "./", // 路径配置
    "outDir": "./dist",
    "paths": { "@": ["src"], "@/*": ["src/*"] },
    "target": "ESNext",
    "lib": ["DOM", "DOM.Iterable", "ESNext"], // 要包含在编译中的依赖库文件列表
    "module": "ESNext", // 指定模块代码生成
    "skipLibCheck": true, // 跳过所有声明文件的类型检查
    "allowJs": true, // 允许编译 JavaScript 文件
    "esModuleInterop": true, // 禁用命名空间引用 (import * as fs from "fs") 启用 CJS/AMD/UMD 风格引用 (import fs from "fs")
    "allowSyntheticDefaultImports": true, // 允许从没有默认导出的模块进行默认导入
    "forceConsistentCasingInFileNames": true, //    禁止对同一个文件的不一致的引用。
    "experimentalDecorators": true, // 启用对ES装饰器的实验性支持

    /* Bundler mode */
    "moduleResolution": "node", // 使用 Node.js 风格解析模块
    "allowImportingTsExtensions": true,
    "resolveJsonModule": true, // 允许使用 .json 扩展名导入的模块
    "isolatedModules": true, // 将每个文件作为单独的模块
    "noEmit": true, // 不输出(意思是不编译代码,只执行类型检查)
    "jsx": "react-jsx",


    /* Linting */
    "strict": true, // 启用所有严格类型检查选项
    "noUnusedLocals": true, // 报告未使用的本地变量的错误
    "noUnusedParameters": true, // 报告未使用参数的错误
    "noFallthroughCasesInSwitch": true, // 报告switch语句的fallthrough错误。(即,不允许switch的case语句贯穿)
  },
  "include": ["src/**/*.ts", "src/**/*.tsx","src/**/*.d.ts", "lib"],
  "references": [{ "path": "./tsconfig.node.json"}]
}
最后
以上一个简单的React项目创建的流程,整体配置属于比较简洁,最后再配置一下 vite.config.ts。修改 vite.config.ts 内容:
import { ConfigEnv, defineConfig, UserConfig } from 'vite';

import { createConfig } from './build';

// https://vitejs.dev/config/
export default defineConfig((params: ConfigEnv): UserConfig => {
  const config = createConfig(params);
  return config;
});
然后在根目录下新建 build 目录,然后新建 index.ts、plugins.ts、types.ts、utils.ts。
index.ts:
import merge from 'deepmerge';
import { ConfigEnv, UserConfig } from 'vite';

import { createPlugins } from './plugins';
import { Configure } from './types';
import { pathResolve } from './utils';

export const createConfig = (params: ConfigEnv, configure?: Configure): UserConfig => {
  const isBuild = params.command === 'build';

  return merge<UserConfig>(
    {
      plugins: createPlugins(isBuild),
      resolve: {
        alias: {
          '@': pathResolve('src')
        }
      },
      css: {
        modules: {
          localsConvention: 'camelCaseOnly'
        }
      }
    },
    typeof configure === 'function' ? configure(params, isBuild) : {},
    {
      arrayMerge: (_d, s) => Array.from(new Set([..._d, ...s]))
    }
  );
};
plugins.ts:
import react from '@vitejs/plugin-react';
import { PluginOption } from 'vite';

export function createPlugins(isBuild: boolean) {
  const vitePlugins: (PluginOption | PluginOption[])[] = [react()];
  return vitePlugins;
}
types.ts:
import { ConfigEnv, UserConfig } from 'vite';

export type Configure = (params: ConfigEnv, isBuild: boolean) => UserConfig;
utils.ts:
import { resolve } from 'path';

export const pathResolve = (dir: string) => resolve(__dirname, '../', dir);